 |
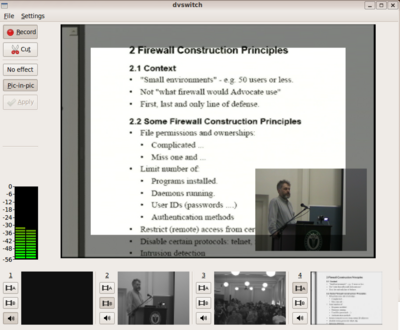
- The dvswitch interface has a main window, some buttons on the left side and the lower part to display the different sources status.
- Each new source that you start will appear as a small frame below and you can switch between them by pressing 1 2 3 or clicking the source's A to get the most relevant picture of the event. What goes into the main window is what will be streamed and recorded.
- The real recording process will only start when the record button is pressed in the dvswitch GUI. If you see a large white text saying STOP you need to press the record button!!! The cut button will start a new file in the server. It should be pressed at every start and end of events and breaks, so that we have smaller files to deal with.
- The pic-in-pic feature is used to insert a smaller picture into the main window, so that two different points of view of the same event can be taken into account. To activate this, click pic-in-pic, click the B of the source to embed, drag the mouse to select the area where the new picture should appear, click apply. The embedded stream can be switched by pressing another B. To turn it off, just press Esc or click the no effect button.
- The audio button below the sources frames can select which of them goes to the streaming and recordings. The sound select should always be set to the main camera audio (=to the first source).
- To restart everything, you can simply kill the xserver. Be aware that you then need to press 'record' once, as described above.
- Newer versions of dvswitch have fading features. These are not useful for purposes of Debconf. Normal fading slows down switching between sources and 'manual fading' causes an overlay of the B source with the A-source every time a B source is selected.
|